Saturday, November 26, 2011

Installing a/c: installing the drain pan and completing the framing

When I test fitted the a/c unit, I noticed the front panel tilted funny. It looked like the unit was not level front to back.   That's when I realized that a/c units tilt down when installed in windows and the front panels are angled accordingly. I cut a strip of wood to fit on top of the the front brace for the a/c unit to sit on. This also allows the water which collects in the bottom of the a/c unit to drain correctly.


I drilled some pilot holes to prevent the strip of wood from splitting and installed with screws.

Here's a closer look.

I didn't want the unit to slide around while I drove down the road, so I tacked down some nonskid material. 

Here's a closer look.

I needed to keep the unit centered (left side to right side) in the cabinet, but I also wanted to be able to take the unit out if I needed to. It was a good thing I planned for this because I had to take the unit in and out a couple of times to correct ventilation issues. I bought some threaded furniture glides and rubber end caps (for chair legs). I trimmed the rubber caps    to about half they're length and inserted the metal glides into the caps.

I bought the correct sized tee nuts for the threaded glides.

Drilled a hole for the tee nut to fit into the side framing. The tape on the drill bit lets me drill to the correct depth. I didn't want to drill through the side panel.

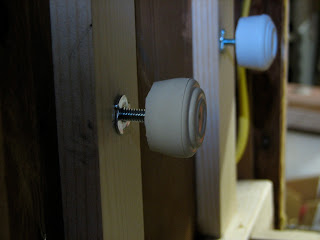
I hammered the tee nuts into the side framing and screwed the glides into the nuts.

Here's a closer look. This is to tighten against the sides of the a/c unit to keep it from moving left and right while I'm driving down the road. I can also adjust the placement of the a/c unit from left to right by screwing this in and out. I placed these in the framing on both sides of the a/c unit.

I used a hole saw bit to drill the hole for my drain. The size of the bit is determined by the diameter of the drain pipe shown a couple of picture down. 

Drilled the hole. 

A closer look.

I put plumbers putty on the drain assembly I bought. I found the drain assembly at Lowes in the RV plumbing section. It can't be the kind that goes under the sink in your house. Those have a hole for the lever to raise and lower the drain plug.

Here I've placed the drain assembly in the hole I cut in the jelly roll pan.

Then I tightened the nut down onto the rubber washer and the plumbers putty.

Here's the view from the top.

Here's the view from the bottom.

I placed the drain pan where its going to go and shined a light down the drain.

This showed me where I need to drill the hole in the floor for the drain line to exit.

I drilled the correct sized hole through the floor of the trailer for the drain.


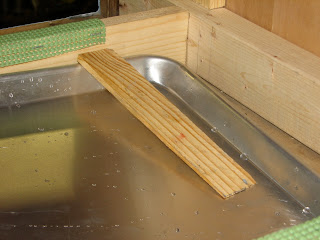
Before I permanently installed the pan, I placed a wood shim under the pan's lip to angle the pan toward the drain hole. This  lets the water run to the drain instead of sitting in the low end of the pan. The pan is a little flexible so this worked great. This is a picture of the shim I used not where it is installed. The shim is installed on the wood ledge just to the right of the pan's lip in the picture above.

This is a picture of the installed drain pan looking from the outside of the trailer. You can see how it's angled to drain toward the drain. You can also see the metal corner brackets I used to install the support framing the a/c unit sits on.
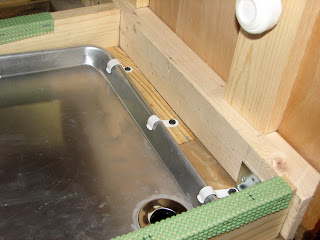
This is a view from the inside of the trailer. You can see the wood shim  mention a couple of picture ago installed just to the right of the pan. I used cable clips to hold the pan in place (pictured on the right side of the pan). 

Here's a close up of the wood shim and the cable clips.

I ran a garden hose through the hole I drilled in the floor of the trailer. The reason I used a garden hose is its flexible and I had it laying around. A guy at the local hardware store showed me the fittings I needed to attach the hose to the drain.

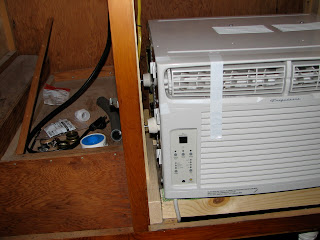
I installed the a/c unit. After I centered the unit, I tightened the threaded casters I'd installed earlier.  You can see them  pictured here tightened against the side of the unit. Notice the units power cord on the bottom left corner. I had to run the a/c unit's electrical plug through this gap before I installed the piece of wood the unit sits on. 

Another picture. You can see the drain on the right side going out the floor.

This a picture of the hose running under the trailer. I didn't want water dripping on the door side of the trailer, so I ran it to the other side of the trailer.


The end of the hose.

I drilled the center out of a brass end cap and got a filter to screw into the end of the hose to keep bugs from building nests in it and blocking it up. 


Here you can see the screen in the end cap.

Installed and draining.

4 comments:

  1. Very nice tutorial and easy for even me to understand. I am keeping this in my Shasta files. Is the air conditioner where the furnace was?
    Dragonfly

    ReplyDelete
  2. Have you any idea how I can remove the moldy looking crud off of the outside of my Shasta?

    ReplyDelete
  3. This comment has been removed by the author.

    ReplyDelete